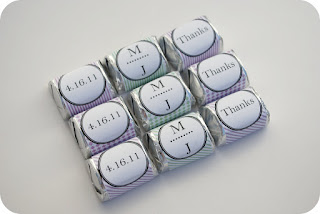
Wrapped Candy Treats Part 1 of 2

Hey you people. I didn't see any comments so perhaps I will tease you with only part 1 of the tutorial. If you like it please let me know!
Hey you people. I didn't see any comments so perhaps I will tease you with only part 1 of the tutorial. If you like it please let me know!
Supplies
· Hershey Nuggets (any flavor)
· Avery Labels 5160
· Printer
Creating your label
Creating your labels is pretty simple. The directions for your version of MS Office might be slightly different depending on where the commands are located, but you should be able to figure it out.
1. In Office, start up a fresh document.
2. Go to the “Tools” menu
3. Select “Labels”
· You should make sure to have 8160 listed as your label, if not, select the “Options” button and search for it. · Make sure you have “Full page of the same label” selected under the number of labels. · Leave everything else blank and select the “OK” button. |  |
4. Office will now create a blank template of your labels. You will notice that there are some gray lines. These are your guidelines for you labels and you don’t want to mess with them!
Creating the background
In the first box, you are going to draw a box so here we go!
1. Go to your drawing tool and make a box 1” for height and 2.5 for the width or you can just draw it the size of the box. Don’t cover the grid lines between the big boxes, these are the empty spaces between your labels.
2. Double click on the box to format the properties of the box. You should get a similar window as below.
To make labels like mine: · Under colors and lines select the drop down for “Fill Color” · Select “Fill Effects” |  |
· Under “Fill Effects” select the “Pattern” tab. · Pick your pattern and colors- be creative! Click “OK” to exit out of these formatting windows |  |
Draw your circles
Now you are going to draw your circle on top of the rectangle.
1. Go to your drawing pallet again and this time you are going to draw a circle.
2. Double click on the circle to get to the formatting window again. This time you are going to change the fill color to white and change the line size and style to what ever you want.
3. When you exit out, your circle should be on top of the rectangle you have drawn. If you don’t see it, then right click on the box to the “Arrange” menu. Select “send to back”. Your circle should now be on top. You might have to goof around with this some to see it correctly.
4. Make sure your circle is in the center of your rectangle.
5. The last step here is to select your square and your rectangle at the same time, and then right click to select the “Group” menu. Select “Group”. This will hold your rectangle and circle together so they don’t slip and slide!
And that my friends is the end of Part 1
And that my friends is the end of Part 1


